
How to Correctly Apply Thermal Paste on GPU/Graphics Card (2023 Step-By-Step Beginner’s Guide)
If you know a thing or two about computers, you’re aware of how important thermal paste is for keeping your CPU cool. However, you may not know this, but your GPU also needs a good-quality thermal paste to keep operating well.
Many people overlook the importance of thermal paste in the GPU, simply because it’s not that apparent. However, it’s indeed important to keep an eye on your GPU and replace the thermal paste whenever it gets degraded. In this post, we talk about how you can apply thermal paste on your GPU the correct way.
Let’s get started.
Different thermal paste patterns on GPU
No matter whether you’re applying the paste on your CPU or GPU, the rule of thumb is to get a thin and even layer on the processor. If the layer is too thick, it will increase the physical distance between the processor and the heatsink, which reduces performance. If you apply too little paste, all the air gaps between the two won’t be filled up, which, again, leads to lower thermal performance.
So, the goal is to get a uniform layer that’s not too thin or too thick. To achieve that goal, you may use different application methods.
Now, there are 6 application methods to apply thermal paste on the CPU, but only 2 viable methods to apply it on a GPU.
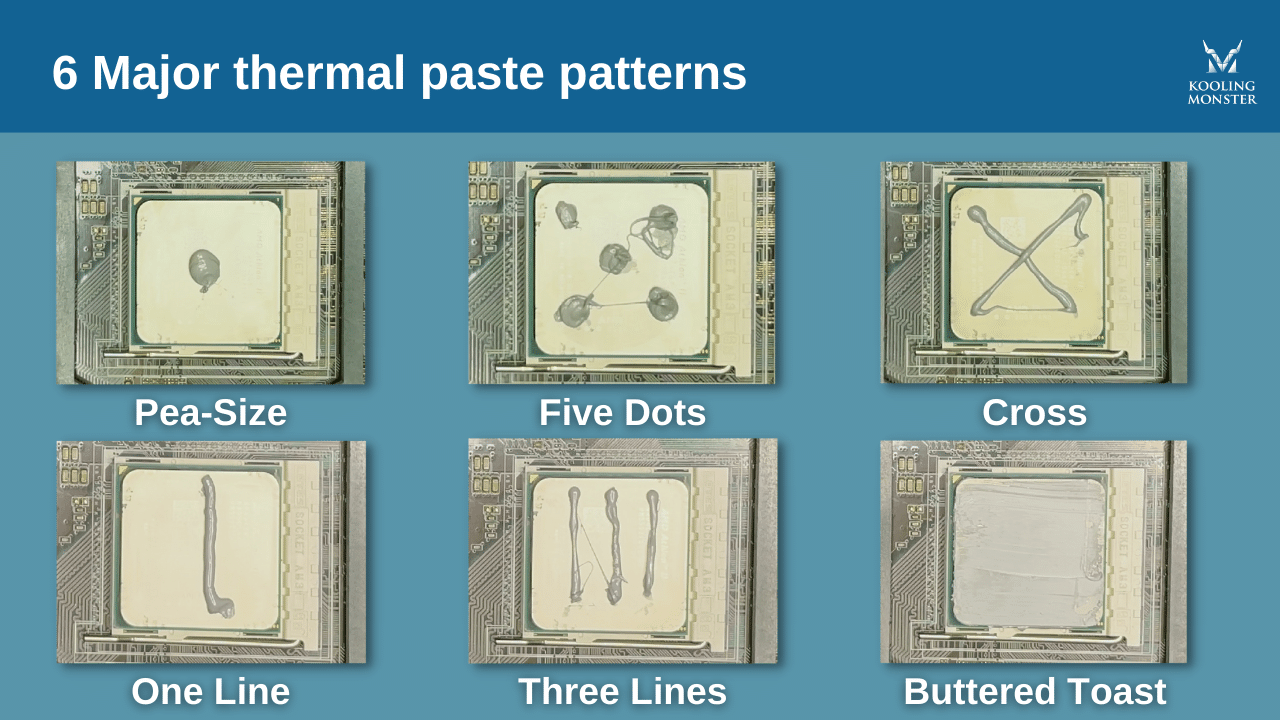
“Why?”, you may ask. Well, the average size of a GPU is much smaller than that of a CPU. So, there’s no way to apply complicated patterns on the GPU, and it doesn’t make sense either. Here are the methods you could use to apply thermal paste to the CPU.
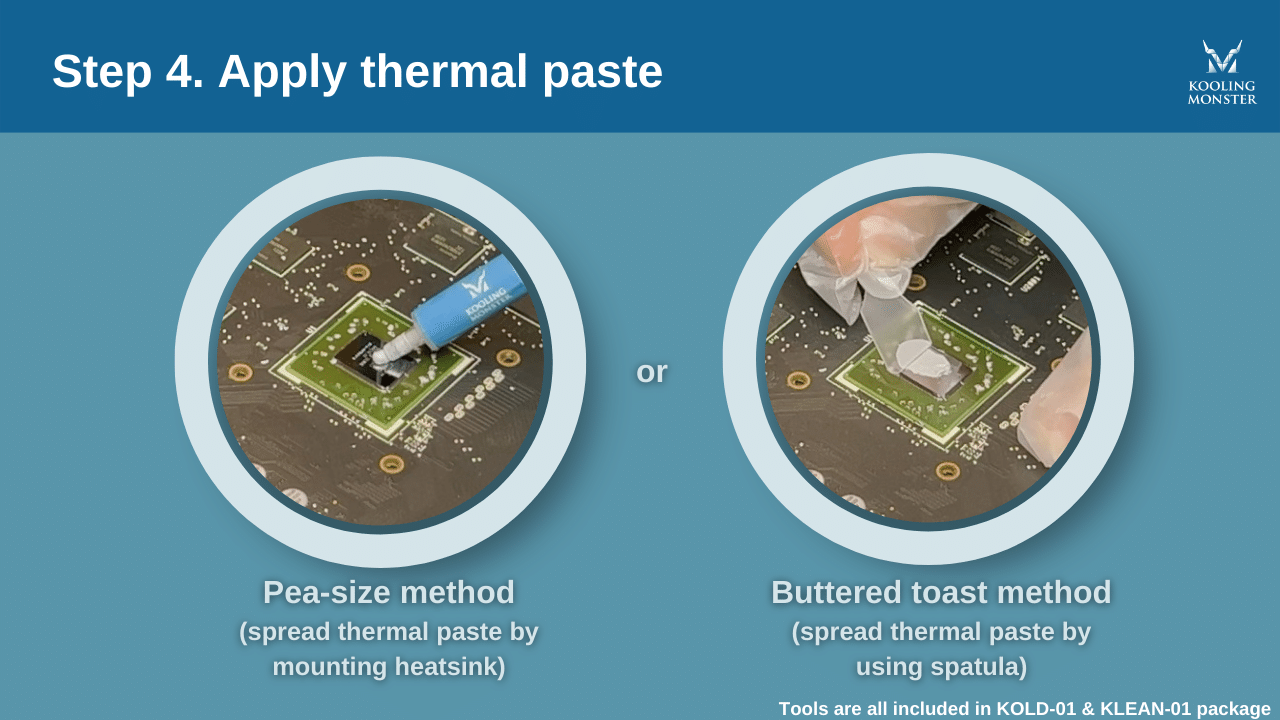
Here are the methods you could use to apply thermal paste on the GPU.
Pea-size — one large dot in the middle
Buttered toast — spread the paste across the surface with a spreader
Now, if you’re wondering which of the two methods you should use to apply the paste on your GPU, there’s a simple rule to follow.
If you’re a beginner who has a poor judgment of how much paste you’re applying, the buttered toast method is the best way. That’s because it lets you visually see how much paste you’ve applied before you put the heatsink down. If there’s too much, you can remove the excess. If there’s too little, you can apply more.
But — if you’re experienced and can identify the volume of thermal paste just by looking at the size of the dot, the pea-size method is also a good choice for you. In fact, any of the two methods would work well for you. So, go ahead and pick whichever you like better.
Best way to apply thermal paste on GPU
To correctly apply thermal paste on your GPU, follow the steps mentioned below.
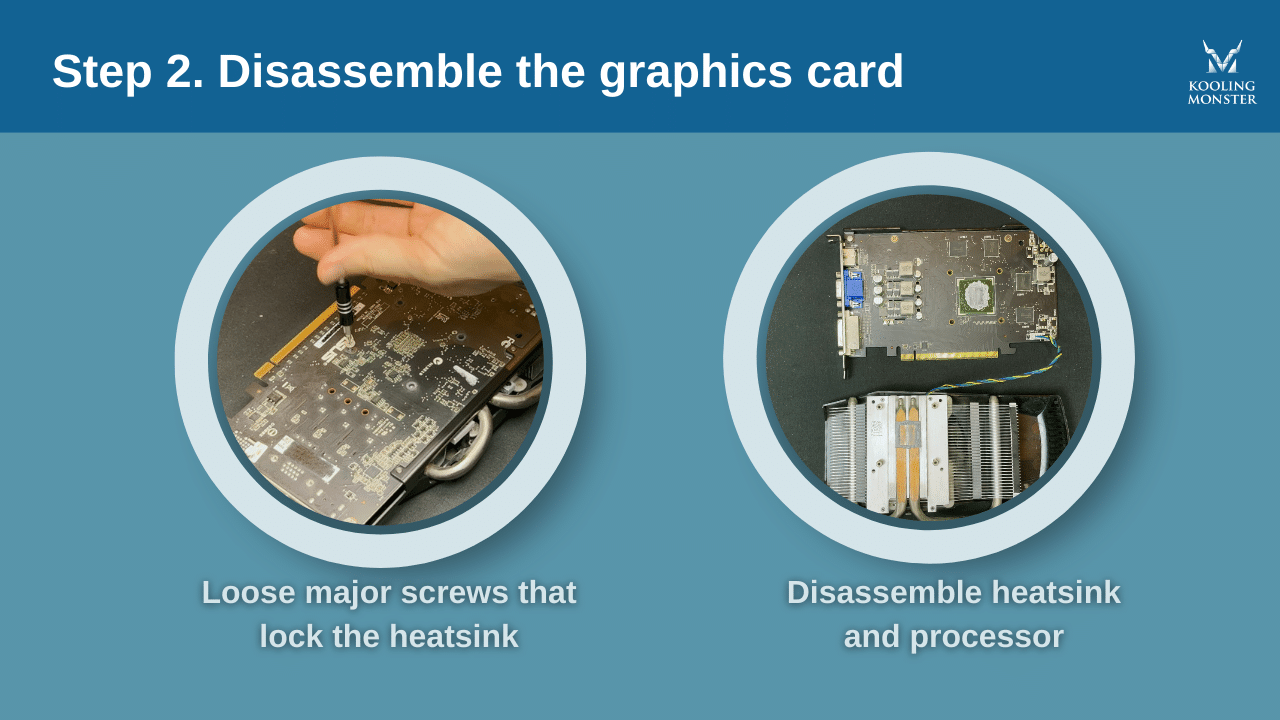
1. Remove your GPU from the computer.

2. Disassemble the GPU. To do that, you’d have to remove all the screws from the main plate, disconnect the cable fan, and remove the cover.
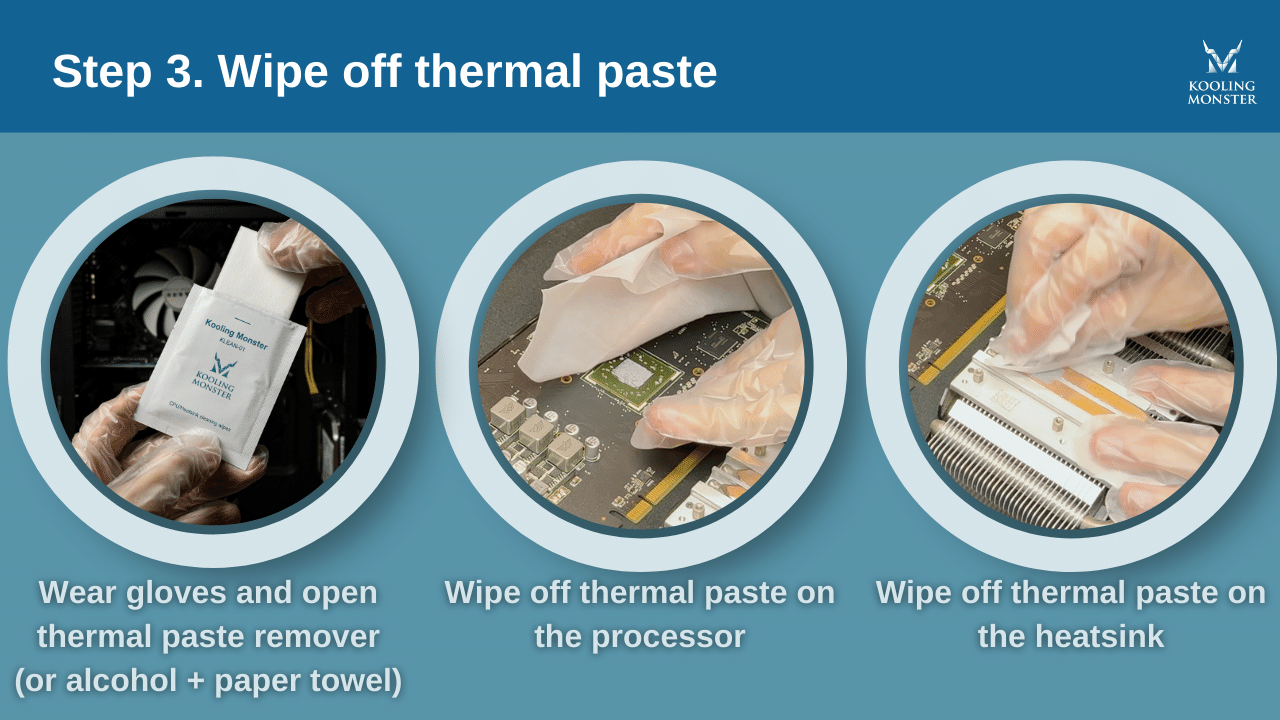
3. Clean the old thermal paste from the GPU. While you could use rubbing alcohol and cotton swabs to do that, it’s not recommended. The best way to handle the situation is to use a dedicated thermal paste remover from Kooling Monster called KLEAN-01. It cleans frozen thermal paste as a knife cuts through butter. Plus it comes with a pair of protective gloves, so you don’t have to touch any chemicals.
4. Put the new thermal paste on using the pea-size or buttered toast method. We recommend using Kooling Monster KOLD-01 Thermal paste to achieve the best performance.
5. Place the heatsink back on top, and reassemble the GPU and put it back into the computer.
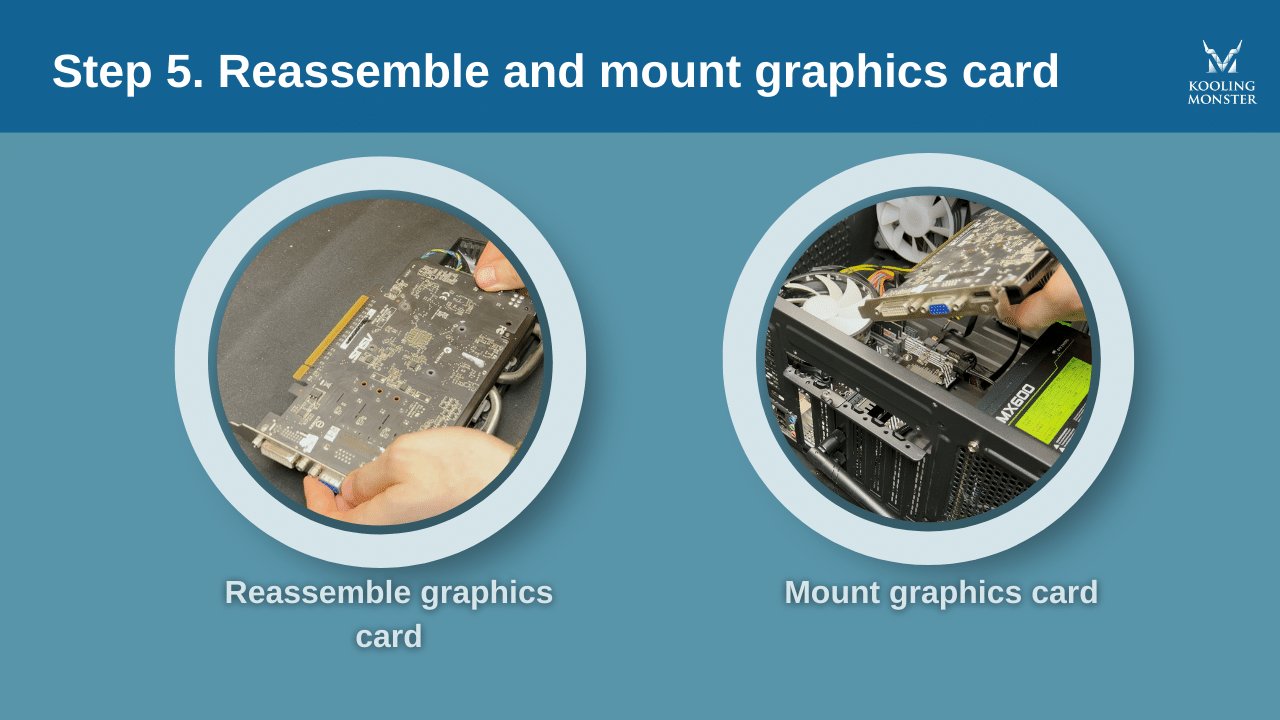
And there you go, you’ve successfully changed the thermal paste on your GPU.
How much thermal paste do I need?
Well, it varies wildly based on your processor size. The larger the processor, the more paste you’d need to form a thin and uniform layer.
However, for a 15mm by 10mm processor, 0.1ml thermal paste is the sweet spot. Any more than that would form a layer that’s too thick. If you don’t know your GPU size, check the packaging it came in — or you could also check the product specifications on its website.
Remember, the key is to avoid forming a layer that’s too thick — or too thin that it doesn’t cover the entire surface properly.
If you’re afraid of putting on too much paste, remember that you can always rely on the buttered toast method to get the amount right. It’s essentially the safest bet when you aren’t confident in what you’re doing.
How often to replace thermal paste on GPU
If you have a good-quality thermal paste, say KOLD-01, you’re good to go for 1-2 years. If you do intensive tasks on your computer every day, it may not last that long. That’s because thermal paste degrades faster if you expose it to extensive heat every day.
On the other hand, if you don’t do anything intensive on your computer, the paste may last even longer.
The quality of your thermal paste is a huge deciding factor, too. As mentioned earlier, a good-quality paste can easily last more than a year. But a bad thermal paste, on the contrary, may only last a few months.
Learn more about how often you should replace the thermal paste.
Final thoughts
So, now you know how to apply thermal paste on your GPU the right way. Plus, you know how often should you replace it.
Remember, it’s important to choose your thermal paste wisely. The choice of your thermal paste goes a long way. Considering how affordable good-quality thermal pastes are these days, it just doesn’t make sense to cut corners and get a substandard paste.
So, feel free to check out KOLD-01 right away.
FAQ
How often should you apply thermal paste to GPU?
Thermal paste should be reapplied to your GPU approximately every 1-3 years, depending on usage. This ensures optimal heat transfer between the GPU and heatsink. However, if you notice an unusual temperature rise sooner, it may be time to reapply the paste.
Is Too Much thermal paste bad for GPU?
Yes, applying too much thermal paste can be harmful for a GPU. Excess paste can overflow when the heatsink is applied, potentially causing short circuits if it comes into contact with circuitry or components on the GPU or motherboard.
How do I know if I put enough thermal paste?
You've applied enough thermal paste when a thin, even layer covers the GPU. The paste should fill the micro-gaps on the surface, but not overflow when the heatsink is attached. If temperatures remain within a normal range after application, it's likely you used the correct amount.
Does thermal paste take time to set?
Yes, thermal paste needs time to set. It must fill the micro-gaps between the GPU and heatsink. It can also take some time to "cure" or dry out slightly to reach its optimal performance, though it is designed to stay mostly pliable. The exact time varies by product.