
How to Tell If Thermal Paste Needs Replacing
Deciding when to replace the thermal paste on your CPU or GPU should go beyond just tracking time. Instead, a more insightful approach is to monitor the CPU and GPU temperatures under different conditions, including heavy load and idle time. This can reveal how well your thermal paste is functioning and whether it's time for a change. The way to monitor CPU/GPU temperatures under heavy load and idle time can be found in the next paragraph. (Learn more about How Often Should You Replace Thermal Paste?)
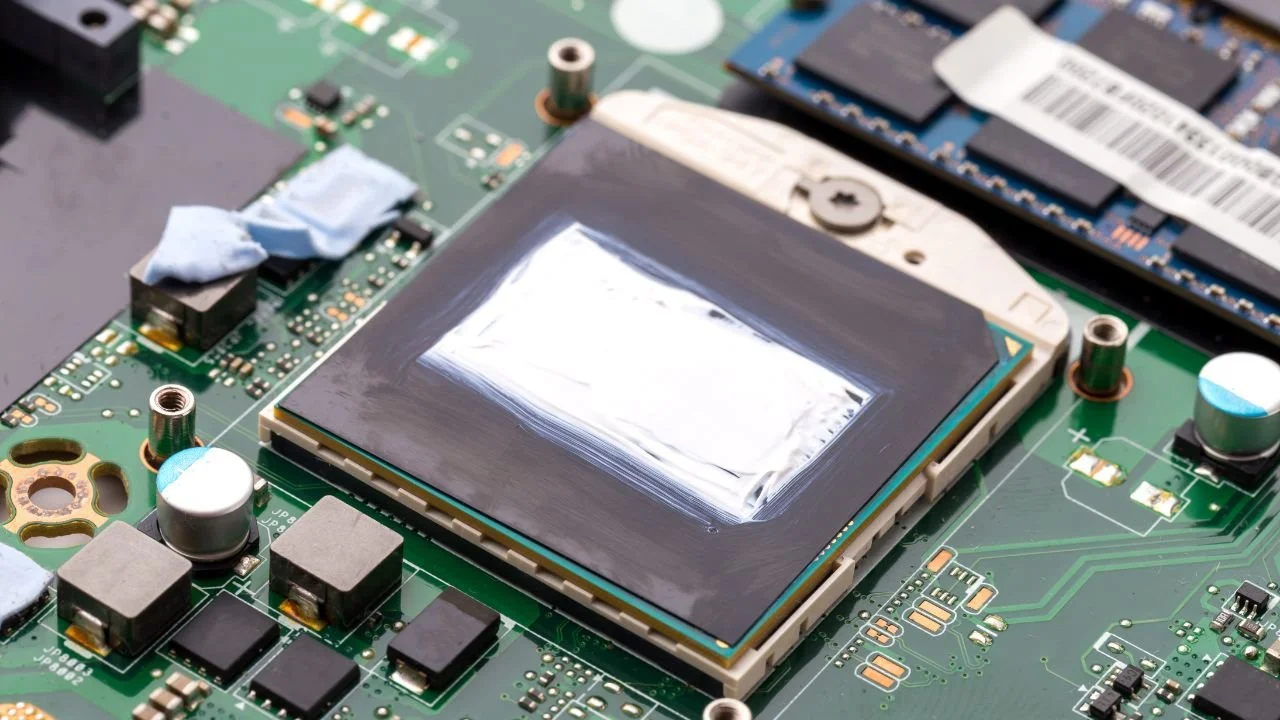
Thermal paste serves the crucial role of facilitating heat transfer between the CPU/GPU and the heatsink. Its need for replacement primarily hinges on whether it retains this function or begins to degrade, often resulting in higher operating temperatures. (Learn more about What Is Thermal Paste?)
Remember, thermal paste degradation isn't merely time-dependent. The way you use your computer and the quality of the original thermal paste significantly impact thermal paste’s lifespan. Intensive tasks can speed up degradation, and a lower quality paste may require more frequent replacements.
Therefore, understanding when to replace your thermal paste demands not just a timeline, but careful observation of your system's performance and knowledge of how various factors contribute to thermal paste degradation. This proactive approach ensures optimal performance and potentially extends your system's lifespan.
Step-by-Step Tutorial to Monitor and Stress Test Your CPU and GPU
Gaining insights into the state of your thermal paste requires you to examine how your CPU and GPU perform under different workloads. This process necessitates the use of two software tools: HWiNFO and AIDA64. HWiNFO provides comprehensive system information and allows you to monitor the temperature of your CPU and GPU. On the other hand, AIDA64 simulates extreme conditions to stress test your system.
Let's delve deeper into the expanded steps of using these tools:
1. Download HWiNFO and ensure you get the most recent versions for complete functionality.

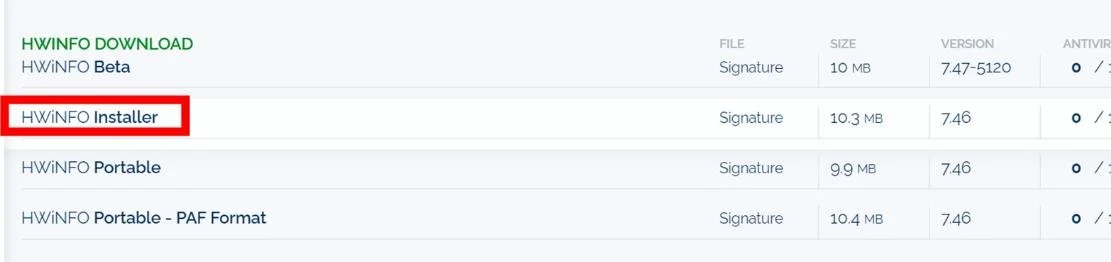
2. After downloading, initiate the installation of HWiNFO.
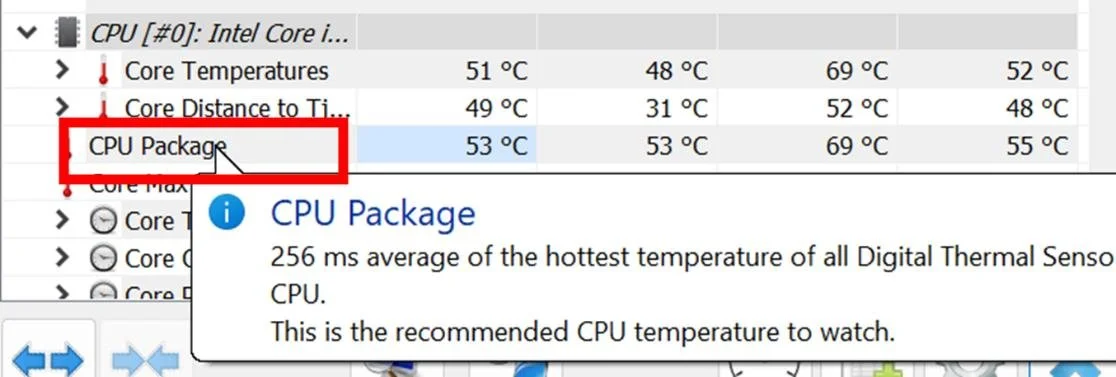
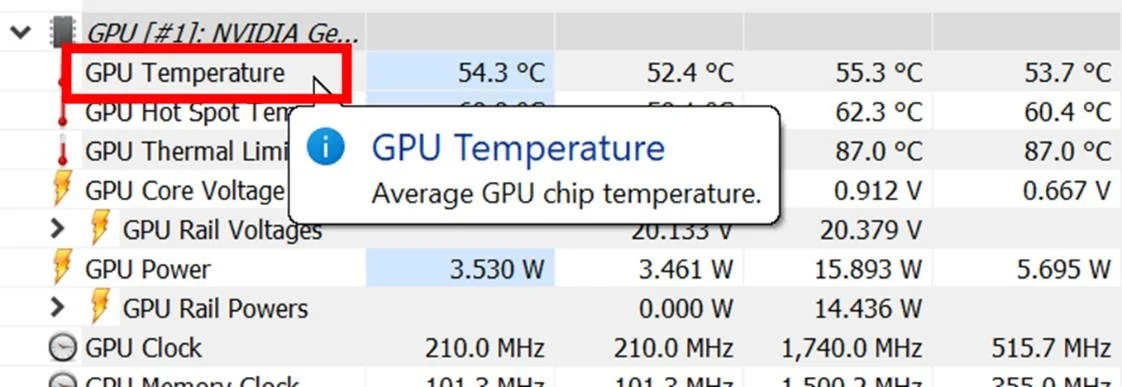
3. Once installed, open HWiNFO in the “Sensors-Only” mode to view your system's sensors, including your CPU and GPU temperature.

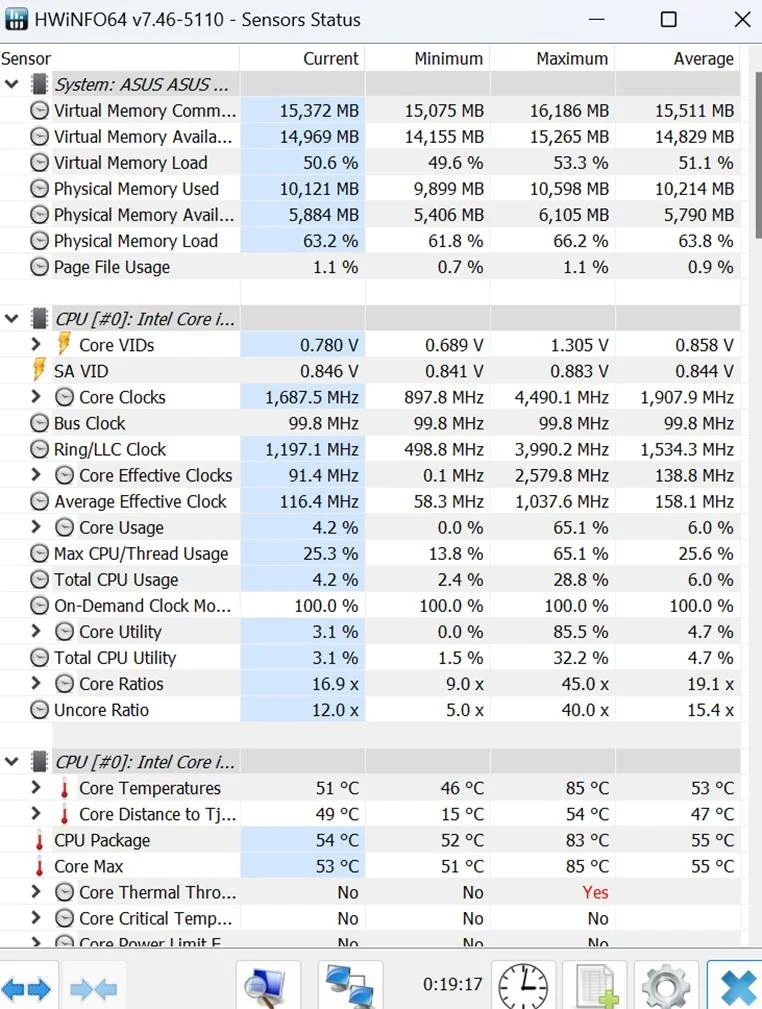
4. Double-clicking “CPU package” and “GPU temperature” will produce a graphical representation of temperature changes over time, giving insight into the CPU/GPU temperature dynamics under idle conditions (we recommend using “CPU package” and “GPU temperature” as they represent the average temperatures on the chips).
5. Download AIDA64 and ensure you get the most recent versions for complete functionality. (AIDA64 is not a free software. However, we can use free trial to meet our needs)
6. Install AIDA64. This process should be similarly straightforward.
7. Open the installed AIDA64 software, which won't require a CD key to access.
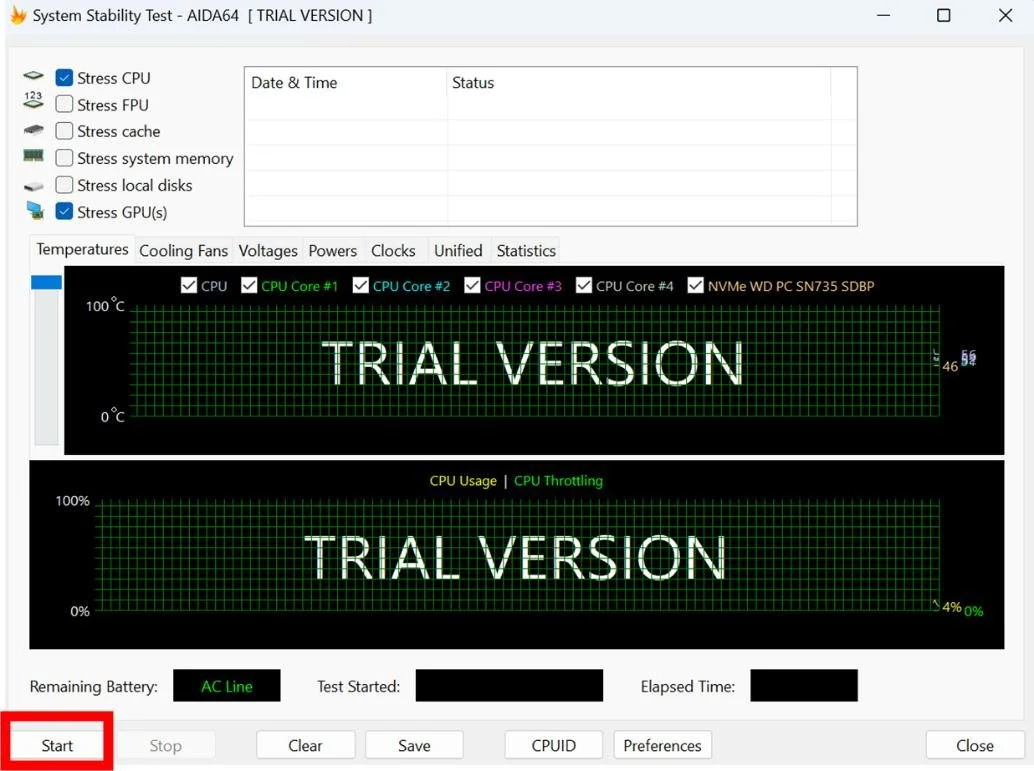
8. Click on the 'system stability test' to prepare for the stress testing of your system.
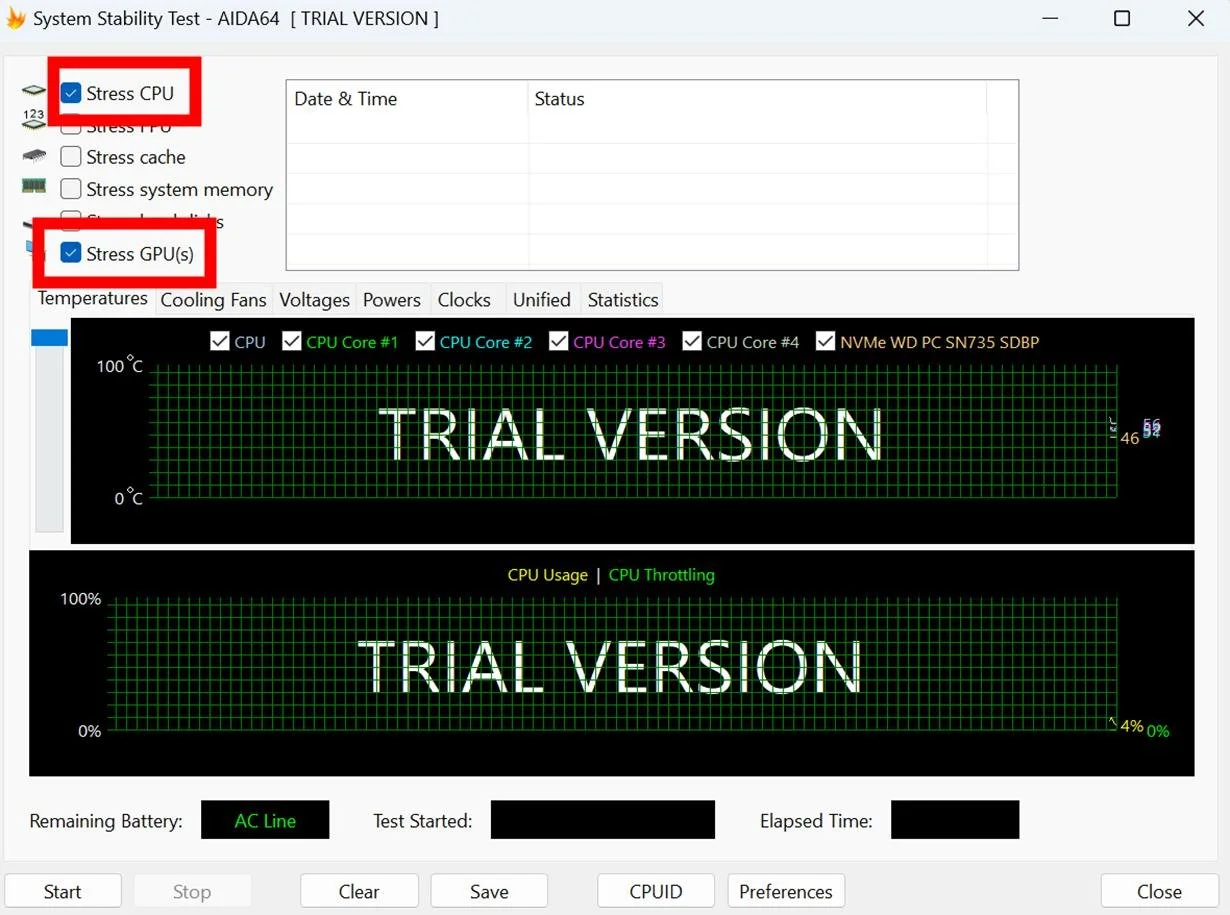
9. Within the stability test, make sure to check the boxes next to "Stress CPU" and "Stress GPU(s)" to include these components in the test.
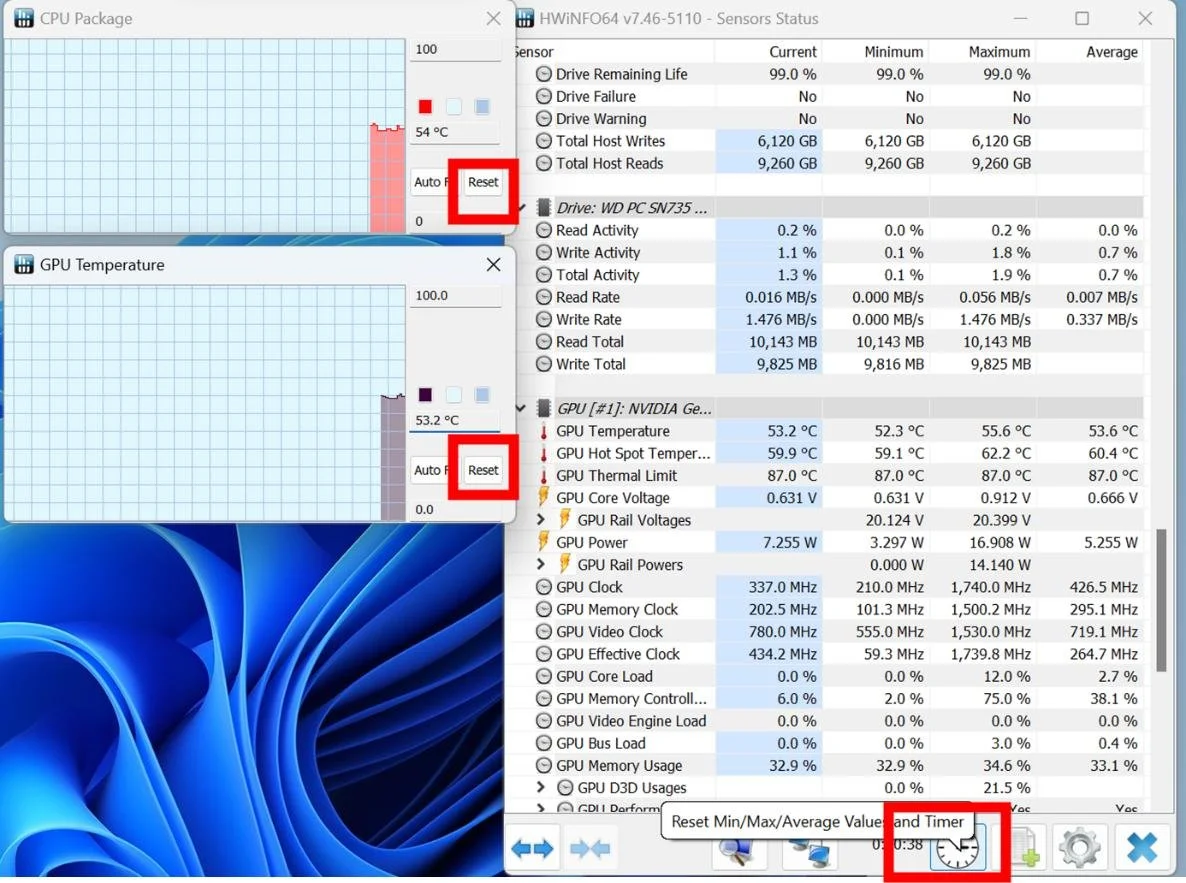
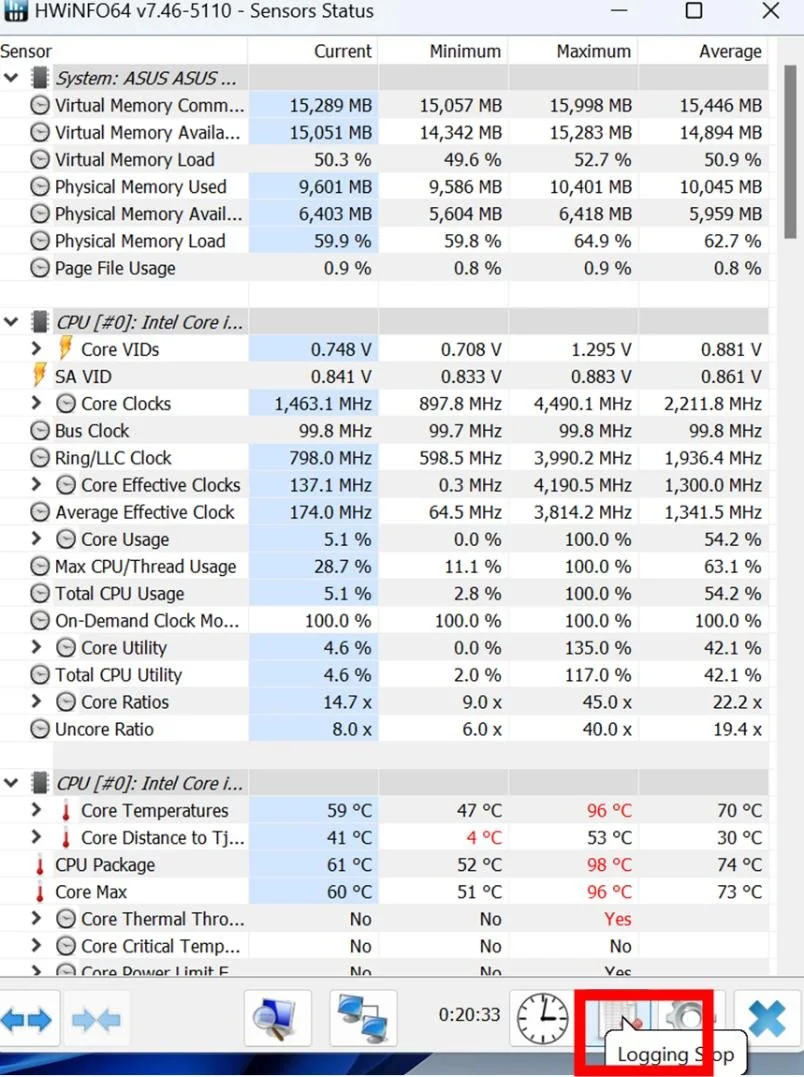
10. At this point, have both HWiNFO and AIDA64 opened concurrently. In HWiNFO, click “Logging Start” to record changes in CPU and GPU temperatures during the stress test.

11. You can reset the timers in HWinFO on dashboard and graphs.
12. Let the system idle for a while (we recommend about 3 minutes) to capture baseline temperatures.

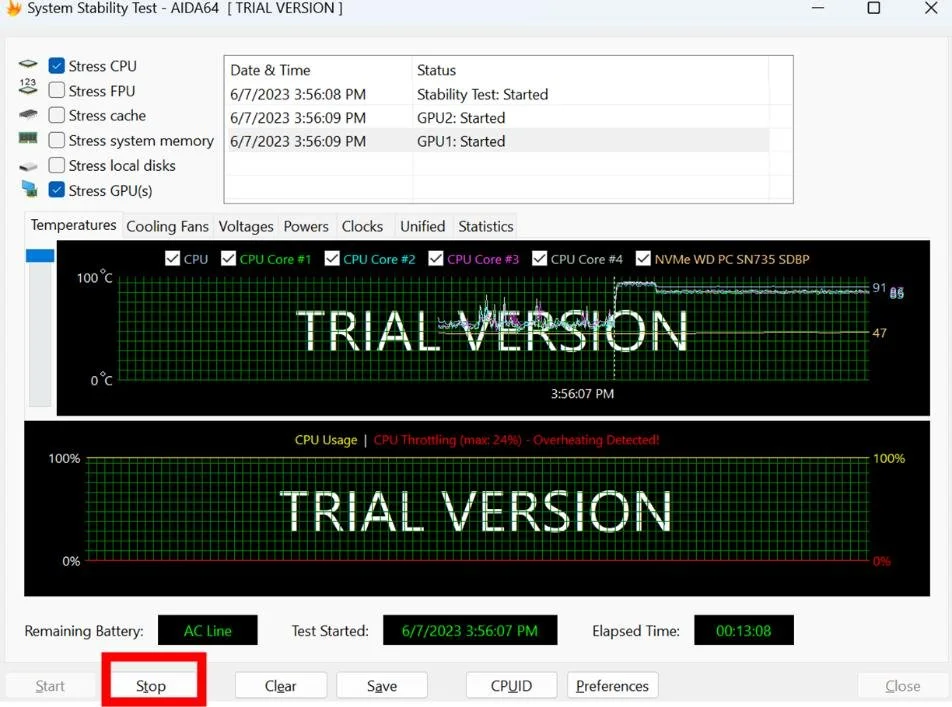
13. Click "Start" on AIDA64 to initiate the stress test. An immediate increase in CPU and GPU temperatures signifies that the test is working. Allow this test to run for approximately 15 minutes to capture stable results.
14. After the test duration, click "Stop" on AIDA64 to cease the stress test, and simultaneously end the temperature recording in HWiNFO by clicking “Logging Stop”.
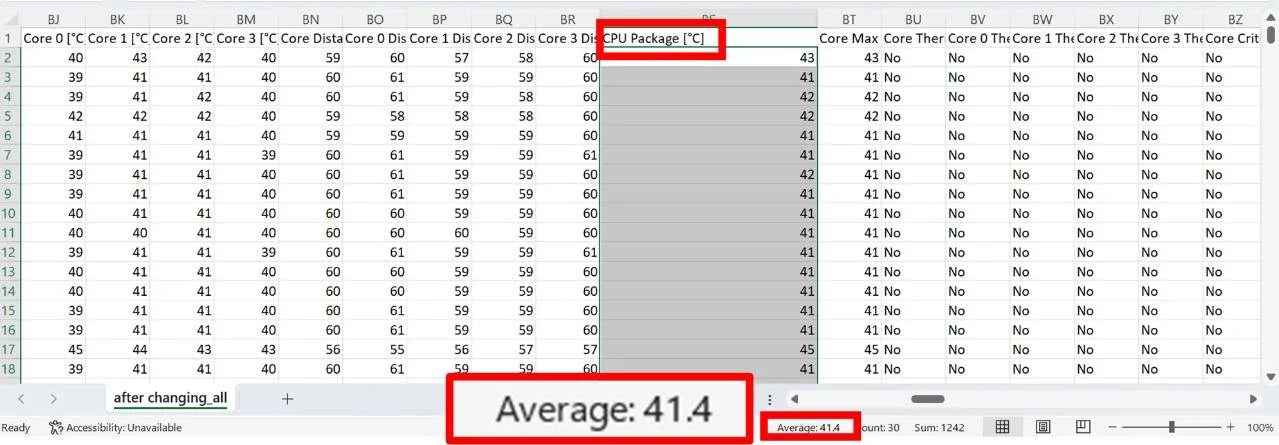
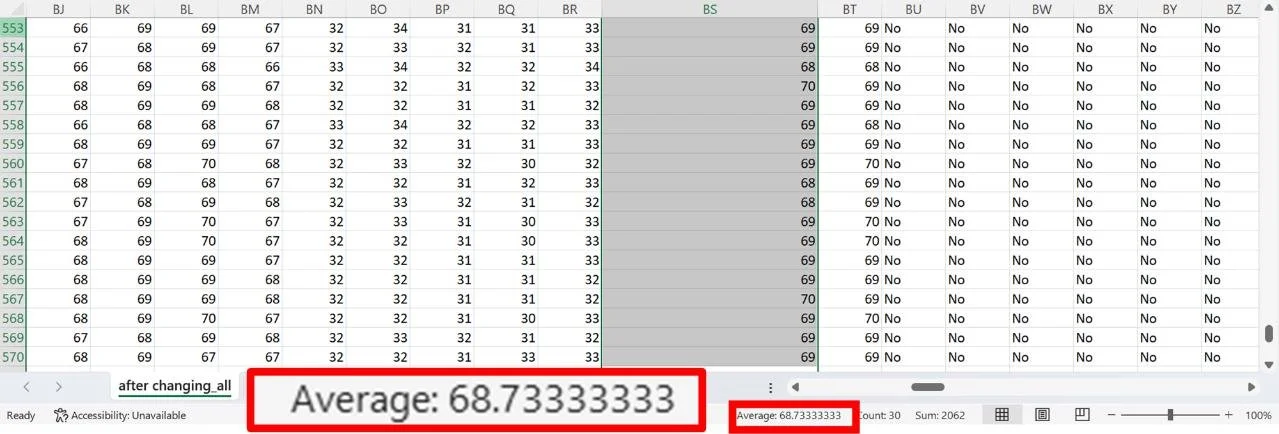
15. Navigate to the file saved from HWiNFO to review your dataset. Look for CPU package temperature and GPU temperature. The first 30 rows will reveal average idle CPU and GPU temperatures, while the last 30 rows provide average temperatures under heavy load.
By following these steps, you're effectively assessing your system's temperature both in idle and under extreme conditions. This gives a clear picture of your thermal paste's efficiency, helping you determine when a replacement is due.
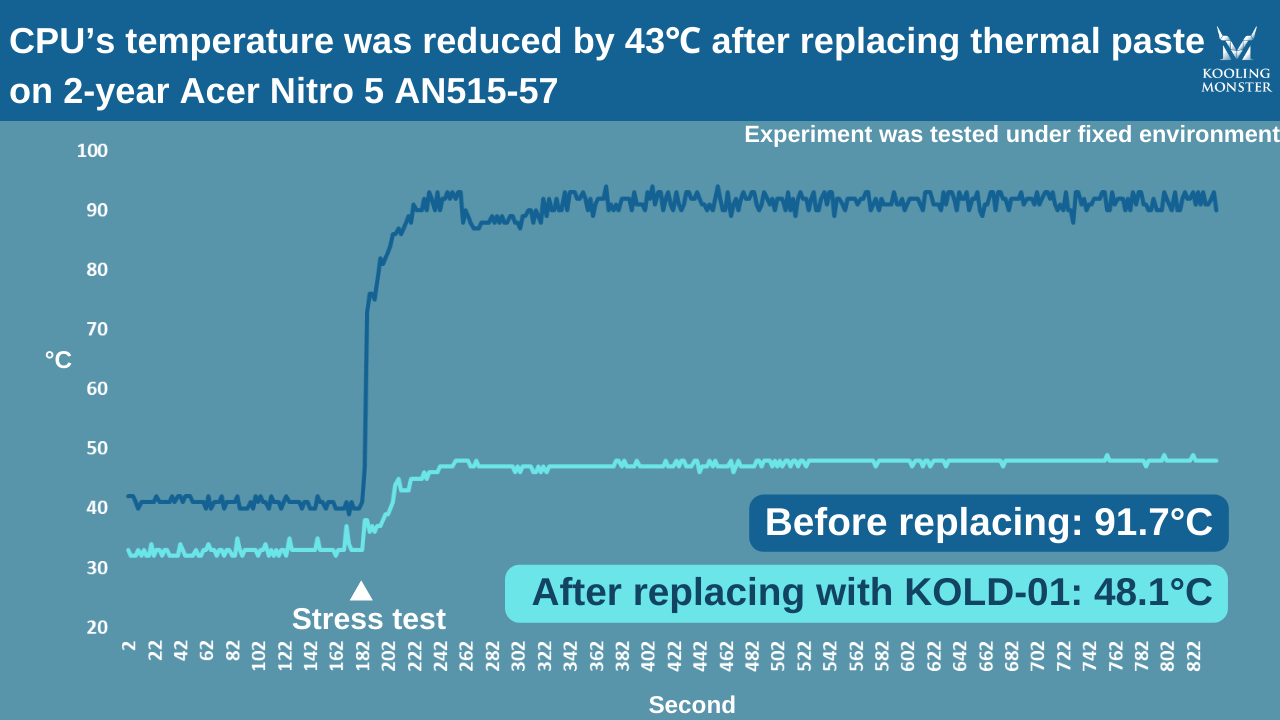
Using the method mentioned above, here's an example that shows the difference in CPU temperature before and after replacing the KOLD-01 thermal paste on a Lenovo Legion Y9000P 2021 model. (Learn more about Lenovo Legion Y9000P 2021H - Cleaning and Changing Thermal Paste)
What Are the Safe Temperatures for CPU/GPU Under Idle and Gaming?
As you evaluate your CPU's and GPU's performance and the condition of your thermal paste, it's essential to know what temperature thresholds to watch for. It's worth noting, however, that these temperatures can be influenced by various factors, including the specific components in your system, the efficiency of your cooling solution, your case's airflow, and even the ambient temperature of your environment. As such, these are aspects to consider if your system consistently runs hotter than expected, potentially indicating a need to replace your thermal paste.
Now let's look at some general guidelines on safe temperature ranges:
CPU Idle Temperature: An idle CPU should typically not exceed 60-65 degrees Celsius. If your CPU idles above this range, it might suggest that your thermal paste is no longer performing optimally and may require replacement.
CPU Load Temperature: When your CPU is put under a heavy workload, it naturally gets hotter. However, temperatures shouldn't exceed 80-85 degrees Celsius. Consistent readings above this range could signify that your thermal paste needs to be reapplied. (Learn more about How to Check CPU Temperature and Why Is It Important? )
GPU Idle Temperature: GPUs often run hotter than CPUs, so don't be alarmed if the idle temperature is a bit higher. However, if the idle temperature consistently exceeds 60-65 degrees Celsius, it could indicate an issue with your thermal paste.
GPU Load Temperature: Just like the CPU, the GPU also heats up under a heavy workload. If you consistently see temperatures above 90-95 degrees Celsius during heavy load, this could be a sign that it's time to reapply your thermal paste. (Learn more about How to Check GPU Temperature and How Hot is Too Hot for a GPU?)
Component | Idle | Heavy Load ---|---|--- CPU | 60-65°C | 80-85°C GPU | 60-65°C | 90-95°C
It's important to remember that these are general guidelines and actual safe temperatures can vary based on the specific processor or GPU model you have. Furthermore, while replacing thermal paste can help bring down temperatures in some situations, it's not a guaranteed fix for all overheating issues. Other factors like poor ventilation, hardware malfunctions, or inefficient cooling solutions could also contribute to high temperatures. Always ensure your components are adequately ventilated and cooled to maintain the health of your system.
How to Replace Thermal Paste on CPU/GPU and Tools to Make the Process Easier
Replacing thermal paste requires careful attention, as the process differs for desktops and laptops.
For desktop users, nuances exist in the application of thermal paste and heat sink attachment, depending on your specific hardware. Our detailed step-by-step guide can assist you in navigating these nuances.
On the other hand, laptops come in diverse layouts, requiring brand- and model-specific guides. Our comprehensive and detailed tutorials focus on laptop models from various brands, aiming to help beginners improve their laptop performance.
In both cases, approach thermal paste replacement with care and precision to ensure improved CPU and GPU temperatures. To enhance your experience and the final outcome, consider utilizing our specially designed tools:
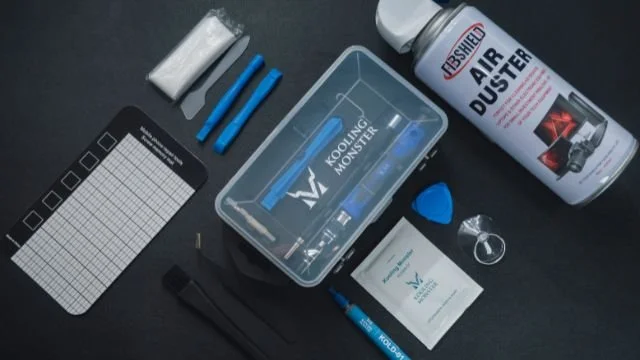
KOLD-01 Thermal Paste: A premium quality thermal paste with a unique non-solvent formulation that increases duration and heat transferability.
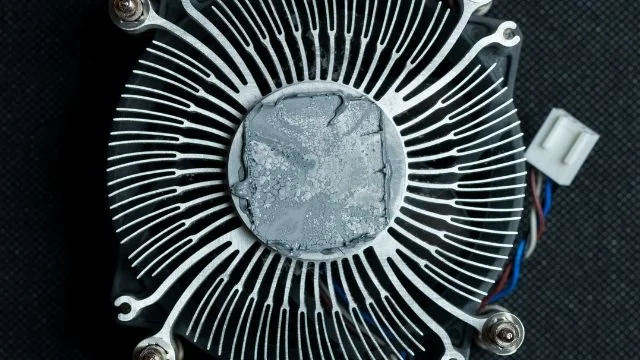
KLEAN-01 Thermal Paste Cleaning Wipes: An efficient solution for cleaning old, dried thermal paste from your processor.
KOMBO-01 Screwdriver Set: Equipped with accessories like an anti-static brush and a magnetic pad, it ensures smooth disassembly of laptops, heat sinks, coolers, and desktop cases.
These tools are designed to make your thermal paste replacement journey smoother and more efficient. Check them out and see how they can make your maintenance task easier.
Summary
Maintaining optimal CPU and GPU performance involves understanding and managing the state of your thermal paste. Monitoring temperature under different load conditions, knowing safe temperature ranges, and following proper steps for thermal paste replacement are critical practices. Remember, ensuring proper ventilation and cooling alongside using quality thermal paste extends your PC’s lifespan and promotes superior performance. By following the guidelines above, you're set for a smoother and cooler computing experience.
FAQ
How long does normal thermal paste last?
Typically, a good quality thermal paste can last between 1 to 2 years. However, its lifespan can vary depending on the quality of the paste, computer usage habits, and operating conditions.
Is it OK to run a CPU without thermal paste?
No, it's not advisable. Thermal paste enhances heat transfer from the CPU to the heat sink, helping prevent overheating. Without it, your CPU could run significantly hotter, potentially leading to damage. (Learn more about Is It Okay to Use My Gaming PC Without Thermal Paste?)
What happens if I don't replace thermal paste?
Over time, thermal paste can degrade and become less effective. If not replaced, your CPU and GPU could overheat, resulting in throttling, system instability, and potentially even hardware damage.
What happens if thermal paste dries?
When thermal paste dries out, its heat conductivity diminishes, which could lead to your CPU or GPU running hotter than normal. This may affect the performance of your PC and shorten the lifespan of your hardware components.
![How to Apply Thermal Paste to a CPU? [2026 Step-by-Step Beginner Guide]](/_next/image?url=%2Fimages%2Fscraped%2F7f0f852b1856.webp&w=3840&q=75)
